Underwater photography allows you to capture the beauty of the ocean and share experiences that few people ever get to see.
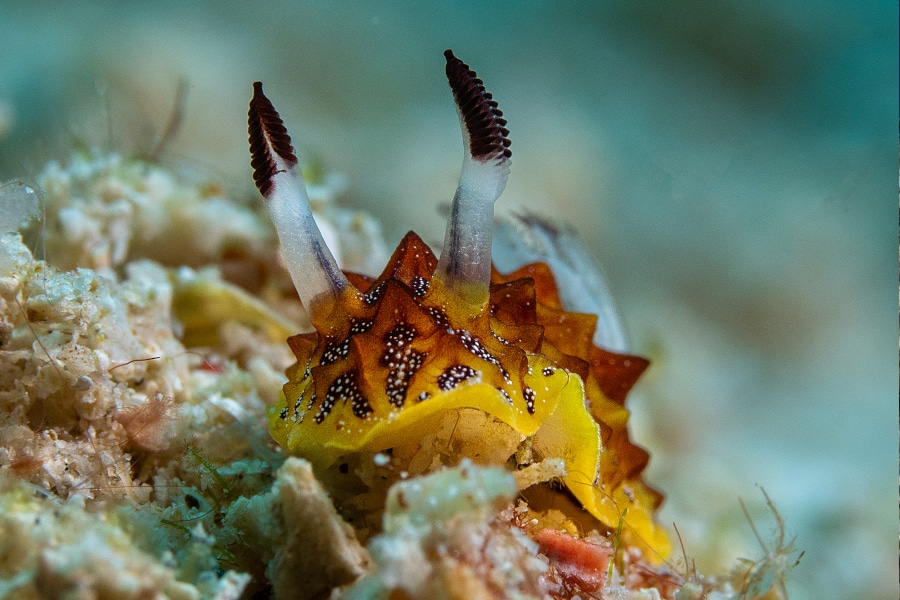
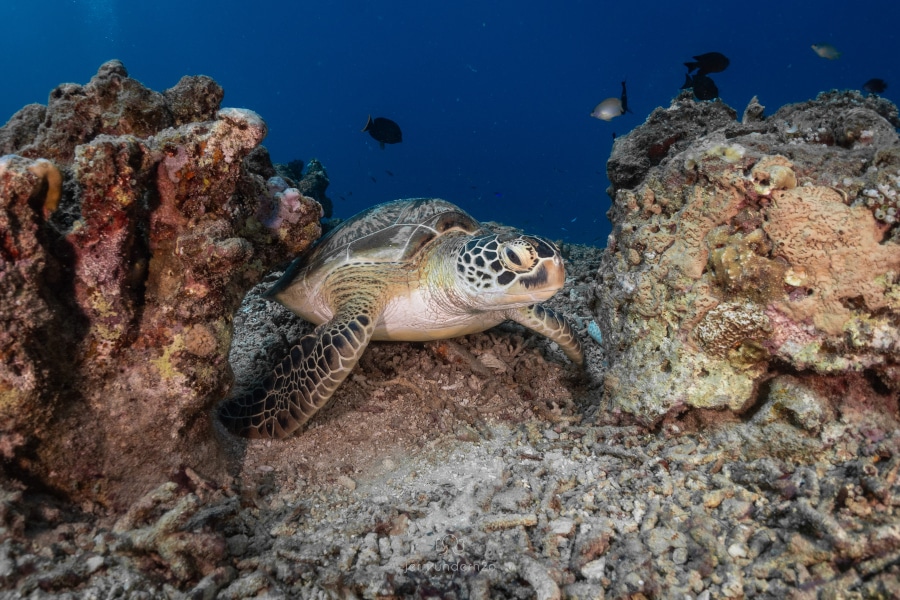
From graceful sea turtles and colourful coral reefs to tiny nudibranchs and reef sharks, every dive offers a chance to create unforgettable images.
At the same time, taking great underwater photos isn’t always easy. Water changes the way light behaves and even small mistakes can affect the final result.
Fortunately, you don’t need expensive equipment to take beautiful photos. With the right techniques and a little practice, anyone can improve their underwater photography.
In this guide, you’ll learn how to choose the right camera, understand underwater lighting, improve your composition, photograph marine life responsibly and capture sharper, more colourful images on every dive.
Why Underwater Photos Look Blue
Have you ever looked at an underwater photo and wondered why everything appears blue or green, even though the reef looked colourful during the dive?
The answer lies in the way water absorbs light.
Unlike air, water quickly filters out different colours of the visible light spectrum.
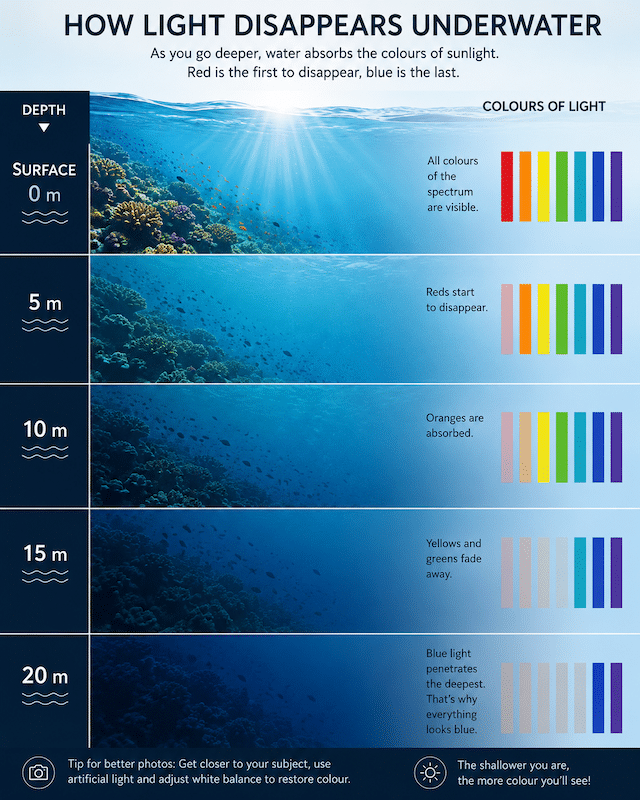
As sunlight travels deeper, the warmer colours disappear first. Red is absorbed within the first few metres, followed by orange and yellow. Green and blue light travel much farther, giving the underwater world its familiar blue appearance.
If that’s the case, why did the reef look so colourful while you were diving? The reason is that your eyes and brain work together to compensate for the missing colours. Your brain automatically adjusts what you see, making the reef appear more vibrant than it actually is.
A camera, however, can only record the light that reaches its sensor. If red light has already been absorbed by the water, the camera simply has no red light to capture.
Distance is another important factor. Even in shallow water, every metre between your camera and the subject reduces colour, sharpness and contrast.
That’s why experienced underwater photographers always try to get as close as possible instead of relying on zoom.
Fortunately, there are several ways to restore natural colours. Adjusting your white balance, using video lights or strobes, and editing your photos afterwards can all make a dramatic difference.
Understanding how light behaves underwater is one of the biggest steps towards taking brighter, sharper and more colourful underwater photographs.
Did you know?
By around 5 metres, most red light has already disappeared. At 15–20 metres, oranges and yellows have largely faded too, leaving the underwater world dominated by shades of blue and green.
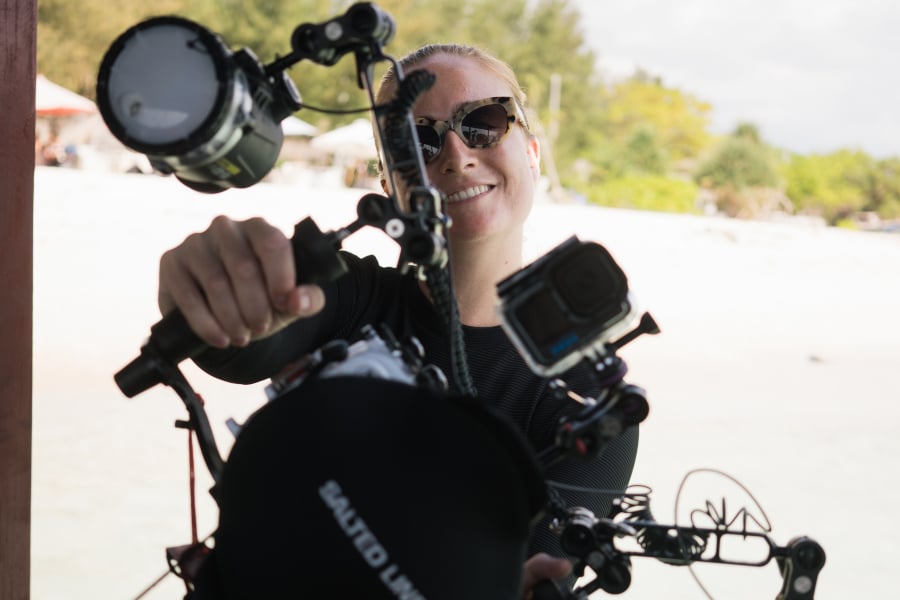
Choosing the Right Camera
The best underwater camera is the one you’ll actually take diving.
While professional camera systems can produce stunning images, modern action cameras and compact cameras are capable of capturing incredible underwater photos.
Consider your budget, photography experience and the type of diving you’ll be doing before choosing a camera.
Smartphone Housings
Waterproof smartphone housings are an affordable option for snorkelling and shallow dives.
They allow you to use the camera you’re already familiar with, but image quality is generally limited compared to dedicated underwater cameras, especially at greater depths.
Compact Cameras
Compact cameras are a popular choice for beginners and recreational divers.
They offer better image quality than most smartphones while remaining lightweight and easy to use.
Many models can also be upgraded with external strobes and wet lenses as your skills improve.
Action Cameras
Action cameras such as the GoPro, DJI Osmo Action and Insta360 are among the most popular underwater cameras today.
They’re small, rugged and excellent for wide-angle scenes, making them ideal for divers who want to capture turtles, reef sharks and colourful coral reefs.
While they’re less suited to macro photography, their ease of use makes them a great choice for most recreational divers.
Mirrorless Cameras
Mirrorless cameras offer excellent image quality, fast autofocus and interchangeable lenses in a relatively compact body.
They have become the preferred choice for many serious underwater photographers because they combine professional performance with a smaller size than traditional DSLRs.
DSLR Cameras
DSLR cameras produce exceptional underwater images and remain popular with professional photographers. They offer outstanding image quality and a wide selection of lenses, although they are generally larger, heavier and more expensive than mirrorless systems.
Whether you’re using a smartphone or a professional camera setup, understanding light, composition and buoyancy will have a much greater impact on your photos than the camera itself.
Understanding Underwater Camera Settings
Modern underwater cameras are capable of taking excellent photos using automatic settings. However, understanding a few basic camera settings gives you much more control over your images and helps you adapt to different lighting conditions underwater.
Aperture
Aperture controls how much light enters the camera through the lens. It also affects depth of field—the area of the image that appears sharp.
A wide aperture (low f-number, such as f/2.8) lets in more light and creates a blurred background, making it ideal for close-up or macro photography.
A small aperture (high f-number, such as f/11) keeps more of the scene in focus, making it better for wide-angle reef and landscape shots.
Shutter Speed
Shutter speed determines how long the camera’s sensor is exposed to light.
A fast shutter speed freezes moving subjects such as turtles, sharks and schools of fish.
A slower shutter speed lets in more light but can result in blurry images if either you or your subject moves.
ISO
ISO controls how sensitive your camera’s sensor is to light.
A low ISO produces cleaner, sharper images with less digital noise but requires more available light.
Increasing the ISO makes it easier to photograph in darker conditions, although very high ISO settings can make images appear grainy.
White Balance
White balance helps restore colours that are lost underwater, especially reds and oranges. Many cameras include an underwater white balance mode, while others allow you to adjust it manually. Shooting in RAW also makes it much easier to correct white balance during editing.
RAW vs JPEG
Most cameras allow you to save photos as JPEG or RAW.
A JPEG file is processed by the camera and ready to share immediately, but it offers less flexibility for editing.
A RAW file stores much more image data, allowing you to recover colours, adjust exposure and fine-tune white balance with better results. If your camera supports it, RAW is usually the preferred choice for underwater photography.
Don’t worry about mastering every setting on your first dive. Start by learning one adjustment at a time, and you’ll quickly gain confidence as you see the difference each setting makes.
Buoyancy Before Photography
Great underwater photography starts with good buoyancy. Never sacrifice your buoyancy or position in the water just to get a photograph.
When you’re concentrating on your camera, it’s easy to forget how close you are to the reef. A fin, knee or camera housing can damage fragile corals in seconds. Good buoyancy allows you to position yourself close to your subject without touching the bottom or reef.
It also keeps you safe. A photographer who is focused on a subject can easily lose track of depth, the current or their buddy. Take the photo, but keep checking your surroundings.
Getting Close
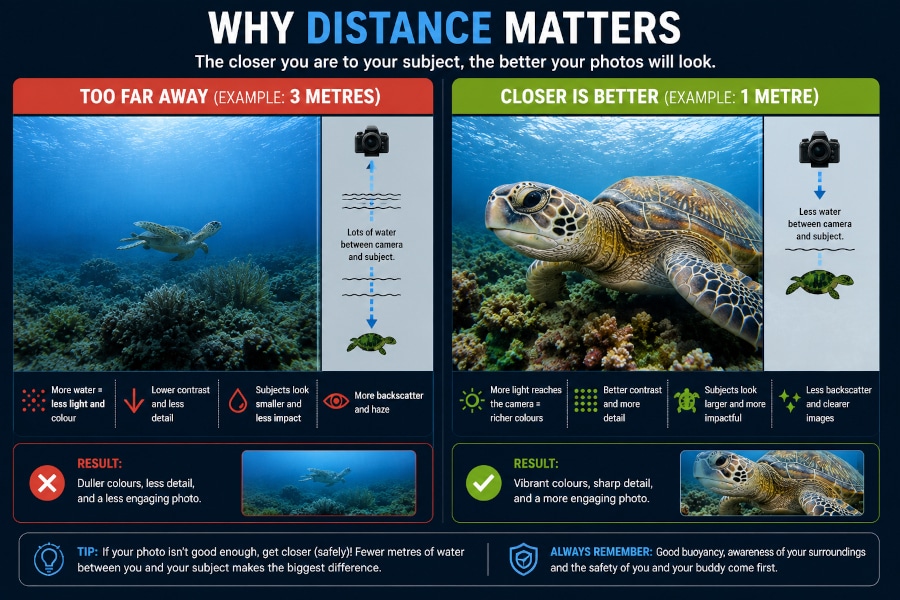
Water is your enemy when it comes to underwater photography. Every metre between your camera and your subject means more water for light to travel through, reducing colour, contrast and sharpness.
Even in clear water, the difference between a subject one metre away and three metres away can be surprisingly noticeable.
This is why one of the most important rules in underwater photography is:
If your picture isn’t good enough, get closer.
Getting closer also means using less zoom and often allows your camera’s lights or strobes to illuminate the subject more effectively.
But getting close doesn’t mean getting too close. Never chase, touch or disturb marine life, and never move yourself onto the reef to get a better angle.
Good buoyancy and patience allow you to get close while giving the animal enough space to behave naturally.
Get close. Stay respectful. Let the subject come to you.
Composition
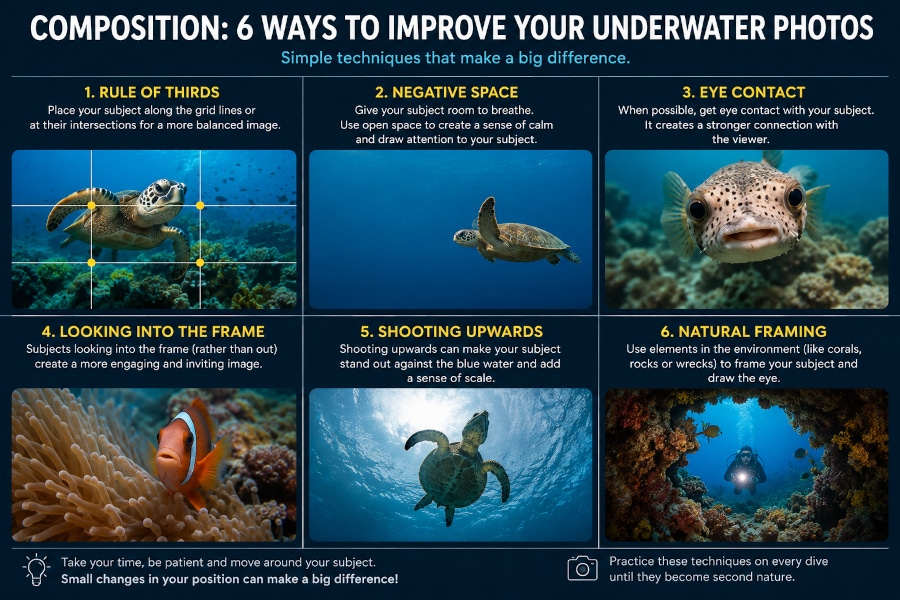
Good composition can turn an ordinary underwater snapshot into a much stronger photograph. You don’t always need to change your camera settings. Sometimes simply changing your position or the direction you point the camera makes the biggest difference.
Rule of Thirds
Imagine your image divided into nine equal sections. Placing your subject near one of the lines or intersections often creates a more balanced and interesting composition than putting it directly in the centre.
Negative Space
Don’t feel that every part of the frame needs to be filled. Open blue water around a turtle, shark or diver can create a sense of space and make the subject stand out.
Eye Contact
When photographing animals, try to capture the eye clearly. An image often becomes much more engaging when the subject appears to look directly at the camera.
Looking Into the Frame
If an animal is facing or swimming in one direction, leave some open space in front of it. This gives the photograph a sense of movement and lets the viewer imagine where the animal is going.
Shooting Upwards
Whenever possible, try shooting slightly upwards rather than directly down at your subject.
This can place the animal against the brighter surface or blue water, creating a cleaner background and a more dramatic image.
Framing
Use the reef, coral formations, rocks or other natural elements to frame your subject. A coral overhang or opening can draw attention towards a small animal while adding depth to the photograph.
The most important rule? Experiment.
Move around your subject, change your angle and take several photographs. Often, the best composition is the one you discover by simply looking at the scene from a different perspective.
Using Natural Light
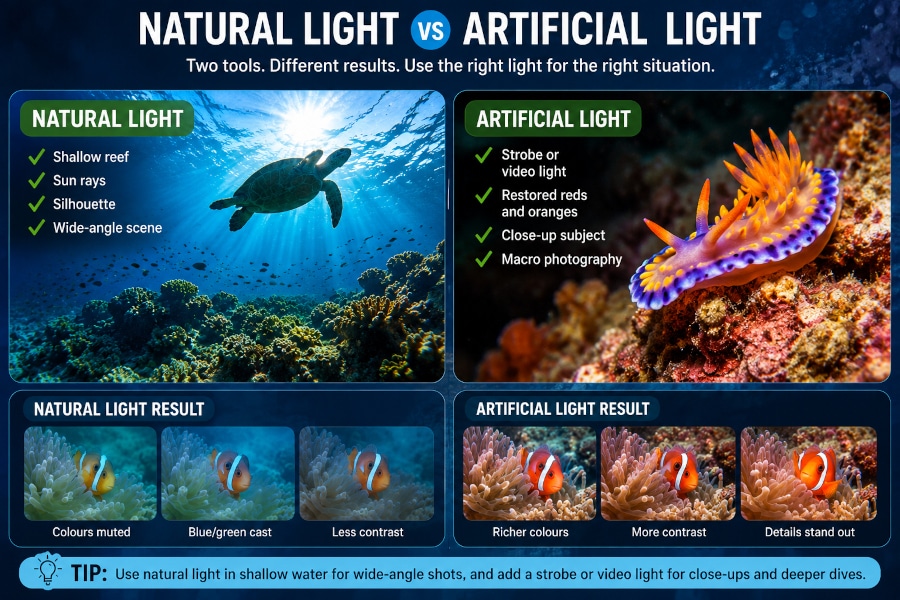
Natural light can produce some of the most beautiful underwater photographs, especially in clear tropical water.
Learning how the position and strength of the sun affect your scene helps you choose the right angle and time to take the shot.
Morning
Morning light is often softer and comes from a lower angle. It can create beautiful light rays and gentle contrasts, particularly in shallow water.
Midday
When the sun is high, there is plenty of light reaching the reef. This can produce bright, clear images and strong colours in shallow water. It is also a good time for wide-angle photography when visibility is excellent.
Afternoon
As the sun moves lower, the light becomes warmer and more directional. Shooting towards the sun can create dramatic rays and silhouettes, while shooting with the sun behind you can illuminate the reef more evenly.
Sunbursts
To capture a sunburst, point your camera towards the sun and partially hide it behind your subject, a diver or a reef formation. A smaller aperture can help create a more defined starburst effect.
Silhouettes
For a silhouette, position your subject between the camera and the brighter surface. Expose for the water rather than the subject, allowing the subject to become dark against the blue water or sunlight.
Tip: Before taking a photo, look at where the sun is. A subject can look completely different depending on whether the sunlight is illuminating it from behind, from the side or from above
Using Strobes and Video Lights
As you move deeper, natural light becomes weaker and colours disappear. Video lights and strobes bring that light back, restoring the reds, oranges and yellows that are lost underwater.
Strobes
Strobes produce a powerful burst of light, making them particularly useful for still photography. They can illuminate colourful coral and marine life while freezing the action in a single shot.
For the best results, position your strobes slightly away from the camera and angle them across the subject rather than pointing them directly at it.
Video Lights
Continuous video lights are useful for both photography and filming because you can see the light on your subject before taking the picture. They are particularly convenient for beginners and for macro photography, although they generally have less power than dedicated strobes.
When Should You Use Them?
Use artificial light when you’re deep enough that natural colours have started to disappear, when photographing close subjects, or when you want stronger and more vibrant colours.
For wide-angle scenes, keep your lights aimed at the subject rather than illuminating the water between you and it.
The clearer the water between your camera and your subject, the cleaner your image will be.
Avoiding Backscatter
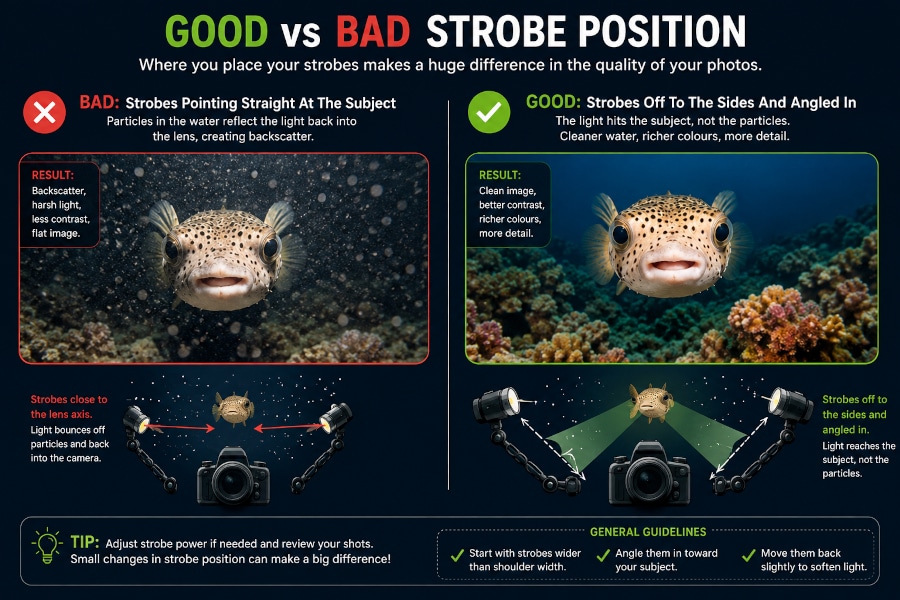
Backscatter is one of the most common problems in underwater photography. Those small white or bright spots in your photos are particles in the water column reflecting light back towards the camera.
The easiest way to reduce backscatter is to keep your strobes away from the camera and angle them outward, so their light illuminates the subject rather than the water directly in front of the lens.
Good Strobe Position
Keep the strobes wide and slightly behind the camera, pointing across the subject.
Bad Strobe Position
Pointing the strobes directly forward sends light straight through the particles between you and the subject, creating backscatter.
Photographing Marine Life
Underwater photography becomes much more rewarding when you stop trying to photograph every animal in the same way.
A turtle needs a different approach from a tiny nudibranch, while schooling fish often require anticipation rather than patience.
The key is to understand the behaviour and environment of your subject, stay calm, and give the animal enough space to behave naturally.
Turtles
Turtles are relatively approachable subjects, which makes them great for underwater photographers. Instead of swimming directly towards one, approach slowly and let the turtle decide how close it wants to get.
For a more dramatic image, try photographing the turtle from slightly below and include the blue water behind it. If it is resting on the reef, get low and shoot horizontally rather than from above.
Watch the turtle’s behaviour. If it starts swimming away, don’t chase it. A patient photographer will often get a much better photograph than someone trying to keep up.
Sharks
Sharks can make spectacular photographs, but patience and good positioning are more important than getting close. Again, avoid chasing them. Instead, find a good position and wait for the shark to come into your frame.
Shooting slightly upwards can create a clean background of blue water and make the shark stand out.
Try to capture the shark when it is swimming towards or across the frame rather than photographing its tail as it disappears.
A wide-angle lens is usually ideal for larger animals. Keep your movements slow and predictable, and always follow your guide’s instructions when photographing sharks.
Frogfish
Frogfish are fantastic subjects because they don’t usually move very far. Their unusual shapes, colours and camouflage make them ideal for close-up photography.
Take your time and look carefully at the subject before positioning your camera. Try different angles rather than simply photographing it from above. Shooting at eye level can make a frogfish much more engaging.
Macro lenses work particularly well, allowing you to highlight the eyes, unusual fins and textured skin. Be careful with your buoyancy around the reef, as frogfish often live among delicate corals and sponges.
Seahorses
Seahorses are small, delicate and easily overlooked. Finding one is only the beginning—the real challenge is getting a good photograph without disturbing it.
A macro lens is usually the best choice. Focus carefully on the eye and use a shallow depth of field to separate the seahorse from its surroundings.
Because seahorses often hold onto sea fans or other structures, avoid touching the reef or grabbing the structure to steady yourself.
Good buoyancy is especially important when photographing such tiny subjects.
Nudibranchs
Nudibranchs are among the best subjects for macro photography. Their bright colours, unusual shapes and tiny details can produce striking images even when the animal is only a few centimetres long.
Get as close as you can without disturbing the animal and focus on the rhinophores or head. Try photographing from the side rather than directly from above to give the image more depth.
Take your time. Nudibranchs move slowly, so you often have plenty of opportunities to experiment with composition, focus and lighting.
Octopus
Octopus are intelligent, expressive and constantly changing, making them fascinating photographic subjects. They can also disappear surprisingly quickly when they feel threatened.
Approach slowly and avoid surrounding or chasing the animal. Give it time to settle and observe its behaviour. You may catch it changing colour, exploring the reef or watching you with one of its characteristic curious looks.
A slightly wider composition can work well, showing the octopus within its surroundings rather than filling the entire frame. If it starts retreating, let it go rather than following it into a hiding place.
Schools of Fish
Photographing schooling fish is less about finding the perfect individual fish and more about capturing the movement and shape of the entire group.
Watch the school before taking your shot. Fish often move in repeating patterns, and waiting for the right moment can produce a much stronger image than simply pressing the shutter continuously.
Shoot slightly upwards when possible to separate the school from the reef and create a clean blue background. Wide-angle lenses work particularly well, especially when you can get close enough to fill the frame.
Try different compositions: the entire school, a dense section of fish, or a single fish breaking away from the group.
Respect Marine Life
A good underwater photograph should document an encounter, not create one.
Don’t chase, touch, move or feed marine life for a photograph. Instead, be patient and let the animal behave naturally. Often, the best images come when you simply stop moving and wait.
Following Green Fins principles also means considering the reef itself. Good buoyancy, careful positioning and keeping equipment away from coral help ensure that photography doesn’t damage the environment we’re trying to capture.
The best underwater photograph is one that leaves no trace.
Photography During Drift Dives
Drift diving adds another challenge to underwater photography: you and your subject are both moving. Instead of fighting the current to hold one position, stay relaxed and let the current carry you.
Anticipate your shots, keep your camera ready and look for moments when the current naturally brings you alongside your subject.
Remember that photography should never interfere with your dive plan, buddy awareness or air supply. If you want to learn more about moving comfortably and safely in current, read our complete guide to drift diving.